Software development
System Requirements
GeoNetwork is a Java application that runs as a servlet so the Java Runtime Environment (JRE) must be installed in order to run it. You can get the JRE from http://www.oracle.com/technetwork/java/javase/downloads and you have to download the Java 6 Standard Edition (SE). GeoNetwork won’t run with Java 1.4. It will run with:
- Java 5 - but few people should be using that now as it is unsupported.
- Java 6 - most testing has taken place under Java 6, so we recommend Java 6.
- OpenJDK 7 - note: problems have been reported with OpenJDK 6.
Being written in Java, GeoNetwork can run on any platform that supports Java, so it can run on Windows, Linux and Mac OSX. For MacOSX, make sure you use version 10.4 (Tiger) or newer. Version 10.3 (Panther) has only Java 1.4 so it cannot run GeoNetwork.
Next, you need a servlet container. GeoNetwork comes with an embedded container (Jetty) which is fast and well suited for most applications. If you need a stronger one, you can install Tomcat from the Apache Software Foundation (http://tomcat.apache.org). It provides load balancing, fault tolerance and other production features. If you work for an organisation, it is probable that you already use Tomcat. The tested version is 6.0.x but GeoNetwork should work with all other versions (>= 5.5).
Regarding storage, you need a Database Management System (DBMS) like Oracle, MySQL, Postgresql etc. GeoNetwork comes with an embedded DBMS (H2) which is used by default during installation. This DBMS can be used for small or desktop installations of no more than a few thousand metadata records with one or two users. If you have heavier demands then you should use a professional, stand alone DBMS.
GeoNetwork does not require a powerful machine. Good performance can be obtained even with 1GB of RAM. The suggested amount is 2GB. For hard disk space, you have to consider the space required for the application itself (about 350 MB) and the space required for data, which can require 50 GB or more. A simple disk of 250 GB should be OK. You also need some space for the search index which is located in GEONETWORK_DATA_DIR/index (by default GEONETWORK_DATA_DIR is INSTALL_DIR/web/geonetwork/WEB_INF/data. However, even with a few thousand metadata records, the index is small so usually 500 MB of space is more than enough.
The software is run in different ways depending on the servlet container you are using:
- Tomcat - GeoNetwork is available as a WAR file which you can put into the Tomcat webapps directory. Tomcat will deploy the WAR file when it is started. You can then use the Tomcat manager web application to stop/start GeoNetwork. You can also use the startup.* and shutdown.* scripts located in the Tomcat bin directory (.* means .sh or .bat depending on your OS) but if you have other web applications in the tomcat container, then they will also be affected.
- Jetty - If you use the provided container you can use the scripts in GeoNetwork’s bin directory. The scripts are start-geonetwork.* and stop-geonetwork.* and you must be inside the bin directory to run them. You can use these scripts just after installation.
Tools
The following tools are required to be installed to setup a development environment for GeoNetwork:
- Java - Developing with GeoNetwork requires Java Development Kit (JDK) 1.6 or greater (scroll down to find 1.6) OR the OpenJDK (version 7 or higher only) for Linux users.
- Maven - GeoNetwork uses Maven to manage the build process and the dependencies. Once is installed, you should have the mvn command in your path (on Windows systems, you have to open a shell to check).
- Git - GeoNetwork source code is stored and versioned in a Git repository on Github. Depending on your operating system a variety of git clients are avalaible. Check in http://git-scm.com/downloads/guis for some alternatives. Good documentation can be found on the git website: http://git-scm.com/documentation and on the Github website https://help.github.com/.
- Ant - GeoNetwork uses Ant to build the installer. Version 1.6.5 works but any other recent version should be OK. Once installed, you should have the ant command in your path (on Windows systems, you have to open a shell to check).
- Sphinx - To create the GeoNetwork documentation in a nice format Sphinx is used.
Check out source code
If you just want to quickly get the code the fastest way is to download the zip bundle: https://github.com/geonetwork/core-geonetwork/zipball/master
However, it is recommended that if you want to contribute back to Geonetwork you create a Github account, fork the Geonetwork repository and work on your fork. This is a huge benefit because you can push your changes to your repository as much as you want and when a feature is complete you can make a ‘Pull Request’. Pull requests are the recommended method of contributing back to Geonetwork because Github has code review tools and merges are much easier than trying to apply a patch attached to a ticket.
The Geonetwork Repository is at: https://github.com/geonetwork/core-geonetwork.
Follow the instructions on the Github website to get started (make accounts, how to fork etc...) http://help.github.com/
Once you have the repository forked or cloned locally you can begin to work.
A clone contains all branches so you can list the branches with:
$ git branch -a
Just look at last section (ignoring remotes/origin/). To checkout a branch just:
$ git checkout 2.8.x
Typically work is done on branches and merged back so when developing normally you will go change to the branch you want to work on, create a branch from there, work and then merge the changes back (or make a Pull Request on Github). There are many great guides (See the links above) but here is a quick sequence illustrating how to make a change and commit the change.
$ git checkout master
   # master is the 'trunk' and main development branch
   # the checkout command "checks out" the requested branch
$ git checkout -b myfeature
   # the -b requests that the branch be created
   # ``git branch`` will list all the branches you have checked out locally at some point
   # ``git branch -a`` will list all branches in repository (checked out or not)
# work work work
$ git status
   # See what files have been modified or added
$ git add <new or modified files>
   # Add all files to be committed ``git add -u`` will add all modified (but not untracked)
$ git commit
   # Commit often.  it is VERY fast to commit
   # NOTE: doing a commit is a local operation.  It does not push the change to Github
# more work
# another commit
$ git push origin myfeature
   # this pushed your new branch to Github now you are ready to make a Pull Request to get the new feature added to Geonetwork
Build GeoNetwork
Once you checked out the code from Github repository, go inside the GeoNetwork’s root folder and execute the maven build command:
$ mvn clean install
If the build is succesful you’ll get an output like:
[INFO]
[INFO] ------------------------------------------------------------------------
[INFO] Reactor Summary:
[INFO] ------------------------------------------------------------------------
[INFO] GeoNetwork opensource ................................. SUCCESS [1.825s]
[INFO] Caching xslt module ................................... SUCCESS [1.579s]
[INFO] Jeeves modules ........................................ SUCCESS [1.140s]
[INFO] Oaipmh modules ........................................ SUCCESS [0.477s]
[INFO] ArcSDE module (dummy-api) ............................. SUCCESS [0.503s]
[INFO] GeoNetwork Web module ................................. SUCCESS [31.758s]
[INFO] GeoServer module ...................................... SUCCESS [16.510s]
[INFO] Gast module ........................................... SUCCESS [24.961s]
[INFO] ------------------------------------------------------------------------
[INFO] ------------------------------------------------------------------------
[INFO] BUILD SUCCESSFUL
[INFO] ------------------------------------------------------------------------
[INFO] Total time: 1 minute 19 seconds
[INFO] Finished at: Tue Aug 03 16:49:15 CEST 2010
[INFO] Final Memory: 79M/123M
[INFO] ------------------------------------------------------------------------
and your local maven repository should contain the GeoNetwork artifacts created ($HOME/.m2/repository/org/geonetwork-opensource).
Note
Many Maven build options are available. Please refer to the maven documentation for any other options, Maven: The Complete Reference
For instance, you might like to use following options :
-- Skip test
$ mvn install -Dmaven.test.skip=true

-- Offline use
$ mvn install -o
Please refer to the maven documentation for any other options, Maven: The Complete Reference
Run embedded jetty server
Maven comes with built-in support for Jetty via a plug-in.
To run GeoNetwork with embedded jetty server you have to change directory to the root of the web module, and then execute the following maven command:
$ mvn jetty:run
After a moment, GeoNetwork should be accessible at: http://localhost:8080/geonetwork
Source code documentation
The GeoNetwork Java source code is based on Javadoc. Javadoc is a tool for generating API documentation in HTML format from doc comments in source code. To see documentation generated by the Javadoc tool, go to:
Creating the installer
To run the build script that creates the installer you need the Ant tool. You can generate an installer by running the ant command inside the installer directory:
$ ant

Buildfile: build.xml
setProperties:
...
BUILD SUCCESSFUL
Total time: 31 seconds
Both platform independent and Windows specific installers are generated by default.
Make sure you update version number and other relevant properties in the installer/build.xml file
You can also create an installer that includes a Java Runtime Environment (JRE) for Windows. This will allow GeoNetwork to run on a compatible, embedded JRE and thus avoid error messages caused by JRE incompatibilities on the PC.
Creating an installer with an embedded JRE requires you to first download and unzip the JRE in a folder jre1.5.0_12 at the project root level. Refer to the installer-config-win-jre.xml file for exact configuration.
Packaging GeoNetwork using Maven
Using Maven, you have the ability to package GeoNetwork in two different ways :
- WAR files (geonetwork.war, geoserver.war)
- Binary ZIP package (with Jetty embedded)
The Assembly Plugin is used to create the packages using
$ mvn package assembly:assembly
The Assembly Plugin configuration is in the release module (See bin.xml and zip-war.xml).
Eclipse setup
Setting eclipse preferences
- M2_REPO Classpath Variable:
- Navigate to Java> Build Path> Classpath Variable
- Press New.. button
- In Name field enter M2_REPO
- In Path field enter the path to your .m2/repository_directory
- Example: “C:Documents and Settingsm.coudert.m2repository”
An alternative to set up this variable directly using maven could to run the following command into your workspace directory
$ mvn -Declipse.workspace=. eclipse:add-maven-repo
- Generate Eclipse project files
To generate all the .classpath and .project files execute the following command at the project root directory
$ mvn eclipse:eclipse
Import source code
In order to import the source code, follow instructions below :
- Press File> Import Menu item
- In new dialog Select General> Existing Projects into Workspace
- Press Next
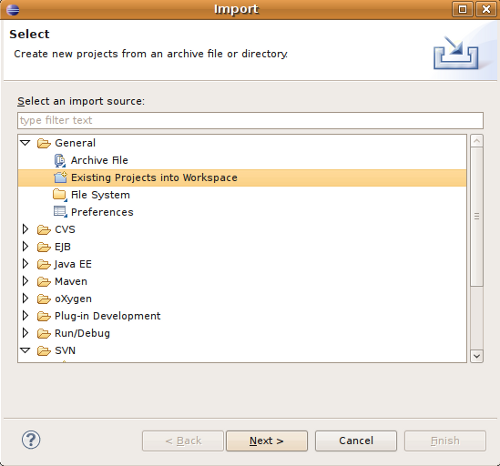
- In Select root directory field enter where your code is:
- example: C:devgeonetworktrunk
- Select All projects and Press Finish button.
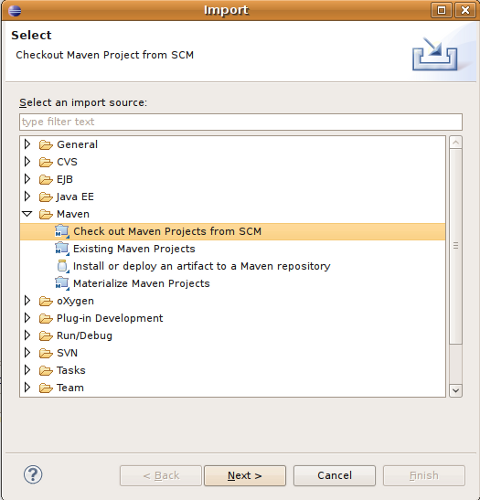
Setting m2eclipse plugin
To install m2eclipse, please refer to the following documentation.
Then click on File > Import > Maven > Check out Maven Projects From SCM Choose svn and enter your Github fork as SCM URL options. (If you have not made a fork you can use: git://github.com/geonetwork/core-geonetwork.git)
Note
It is also possible to import existing Maven projects using Maven (m2eclipse) import facilities choosing the Existing Maven projects option.