Create a stable release for GeoNetwork
This guide details the process of performing a GeoNetwork release.
Note
- BRANCH: Branches are created for major stables releases and end with .x (for example 2.8.x)
- VERSION (for tag): version to release (for example 2.8.1)
- NEW_VERSION (for branch): next version (for example 2.8.2)
Release committee
To create new releases a committee of 3-4 persons should be chosen. The members of the committee are responsible for creating the releases following the steps described in this section.
A rotation policy can be use to select a person from the committee who will be responsible for creating each release.
Notify developer lists
It is good practice to notify the GeoNetwork developer list of the intention to make the release a few days in advance.
On the day the release is being made a warning mail must be sent to the list asking that developers refrain from committing until the release tag has been created.
Prerequisites
- Commit access to GeoNetwork git
- Administration rights to SourceForge server to publish the release
Update source code from GIT
Warning
These steps must be performed on a branch
- Check out the branch to be released
$ git clone --recursive https://github.com/geonetwork/core-geonetwork.git geonetwork-[VERSION]
$ cd geonetwork-[VERSION]
$ git checkout -b [VERSION] origin/[VERSION]
$ git remote-url set origin git@github.com:geonetwork/core-geonetwork.git
- Set submodules to correct branch: Submodules are in subdirectories:docs, gast, geoserver, installer, maven_repo, release. The procedure for each submodule is the same:
$ cd <submodule>
$ git checkout -b [VERSION] origin/[VERSION]
Tests and issues must be resolved for the new release
- Build the application and run the integration tests in web-itests
$ mvn clean install -Pitests
If tests are passed then proceed with the next step. Otherwise:
- If a critical bug is detected, fix before continuing.
- If a non-critical bug is detected, open a new ticket and set its version number to the next release and continue
Create an installer
$ cd installer
$ ant
Using the installer, install GeoNetwork in a folder called geonetwork-[VERSION]
Test any issues relating to the release. Check GeoNetwork trac.
If all tests pass, proceed with the release. Otherwise:
- If a critical bug is detected, fix before continuing with the release.
- If a non-critical bug is detected, set the version number of the ticket to the next release and continue
Note
to discuss and get feedback
This approach requires a code freeze on the branch until the release is done, if all test are ok (no bugs found in tests or non critical bugs), 1 day or less is ok.
If a critical bug is detected, the code freeze can take some time if a bug is complicated to fix. To avoid a prolonged code freeze some alternatives can be considered:
- If there is a commit on the branch before the critical fix is committed then it will be part of the release (properly tested in a new release cycle)
- Fork the repository and commit the critical fix to that fork, then pull the fix into the branch. This allows other developers to commit on the branch while the critical bug is being solved.
Update changes.txt file
- Add an entry to docs/changes.txt describing the changes in this new release, using the following template.
Comments from the GIT commits are used to extract the most important changes (use git help log to work out what you need eg. git log –since=”2 weeks ago”). Some cleanup may be required before the log output can be added to the changes.txt document)
================================================================================
===
=== GeoNetwork [VERSION]: List of changes
===
================================================================================
--------------------------------------------------------------------------------
--- Bug fixes
--------------------------------------------------------------------------------
- Fix fo issue #NUMBER: Description of fix
- Fix fo issue #NUMBER: Description of fix
- ...

--------------------------------------------------------------------------------
--- Changes
--------------------------------------------------------------------------------
- Description of change
- Description of change
- ...
Commit docs/changes.txt file
$ git commit -m "Updating CHANGES for [VERSION]" docs/changes.txt
$ git push
Update version numbers for a release
A *NIX (Linux, OSX etc..) operating system can use the following shell script.
Execute in root of the branch source tree updateReleaseVersions.sh. Example to create version 2.6.1 from 2.6.1-SNAPSHOT
$ ./updateReleaseVersions.sh 2.6.1
Commit updated files
$ git commit -a -m "Updated files version to [VERSION]"
$ git push
Create release tag
Create a tag for the release
$ git tag -a [VERSION] -m "Create tag for release [VERSION]"
Push the tag to github:
$ git push origin [VERSION]
Build release artifacts
Warning
All operations for the remainder of this guide must be performed from the release tag unless otherwise stated.
- Uncomment doc sections in web/pom.xml
<webResources>
  <resource>
              <directory>../docs/eng/users/build/html</directory>
              <targetPath>docs/eng/users</targetPath>
              </resource>
              ...
</webResources>
Build documentation. In docs folder, execute
$ mvn clean install
Note
Building the GeoNetwork documentation requires the following be installed:
Compile and build from the root of the source tree
$ mvn clean install
WAR distribution
After building the release artifacts in the previous steps, the war distribution of the new release will be: web/target/geonetwork.war
Build installers
To build the Windows and platform independent installers, execute the next command in the installer folder
$ ant
The installers (exe and jar) are created in a folder geonetwork-[VERSION]
Upload and release on SourceForge
All of the artifacts generated so far need to be uploaded to the SourceForce File release System:
- WAR distribution
- Installers (exe and jar)
Note
This step requires administrative privileges in SourceForge for the GeoNetwork opensource project.
- Log in to SourceForge.
- Go to the ` GeoNetwork Files section <https://sourceforge.net/projects/geonetwork/files/GeoNetwork_opensource/>`_.
- Add the new v[VERSION] folder for this release.
4.a. Using the commandline secure copy is the simplest way for developers working under a *NIX like system:
$ scp geonetwork.war username@frs.sourceforge.net:/home/frs/project/g/ge/geonetwork/GeoNetwork_opensource/v[VERSION]/
$ scp geonetwork-[VERSION].jar username@frs.sourceforge.net:/home/frs/project/g/ge/geonetwork/GeoNetwork_opensource/v[VERSION]/
$ scp geonetwork-[VERSION].exe username@frs.sourceforge.net:/home/frs/project/g/ge/geonetwork/GeoNetwork_opensource/v[VERSION]/
$ scp docs/readme.txt username@frs.sourceforge.net:/home/frs/project/g/ge/geonetwork/GeoNetwork_opensource/v[VERSION]/
4.b. The same can be accomplished in Windows using WinSCP. Or a desktop client like Cyberduck on Windows and Mac OS X
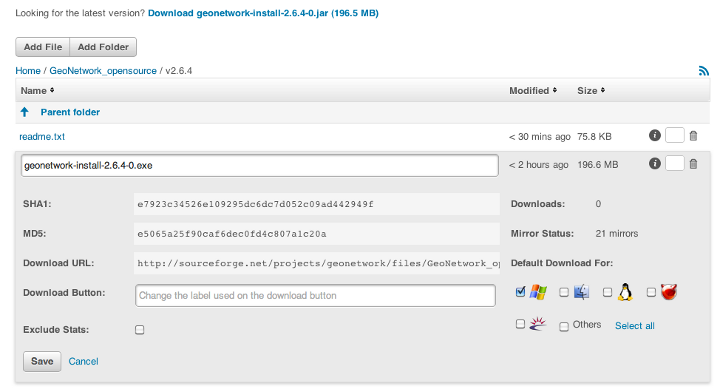
5. Once the upload of the files has been completed, use the web interface to set the default download files. The (i) button allows to set the default operating systems for each installer (.exe for Windows and .jar for all other systems).
- The default downloads are ready now.
Update geonetwork-opensource website
The website requires updates to reflect the new release. Update the version number and add a new news entry in the following files:
website/docsrc/conf.py
website/docsrc/docs.rst
website/docsrc/downloads.rst
website/docsrc/index.rst
website/docsrc/news.rst
website/checkup_docs.sh
Commit the changes and build the website using the Hudson deployment system
Announce the release
Mailing lists
Send an email to both the developers list and users list announcing the release.
TODO: Template mail?
SourceForge
TODO: Do we create SourceForge notifications?
Upgrade branch pom versions
Warning
This steps must be performed using branch code.
After a release has been created, the branch version number must be set to the version number of the next release. On a *NIX (Linux, OSX etc..) operating system you can use the shell script updateBranchVersions.sh to do this.
From the root of the branch source tree execute the script updateBranchVersions.sh. To update from version 2.6.1-SNAPSHOT to 2.6.2-SNAPSHOT for example
$ ./updateBranchVersions.sh 2.6.1 2.6.2
Commit the updated files
$ git commit -a -m "Updated files version to [VERSION]-SNAPSHOT"
$ git push